- Color Name: Granite
- Item Weight 13.85 pounds
- Color Granite

- Color Name: Black
- Style Surface Mount
- Galvanized Steel

- Color Name: Black
- Style Traditional
- Material Aluminum
- Color Name: White
- Item Weight 28 pounds
- Material Steel

- Rubbed Bronze
- Item Weight 10.68 pounds
- Galvanized Steel
Choose the Best Mailbox Post
Customer’s Choice: the Best Rated Mailbox Posts
20 users answered this survey. Please help us improve this review!
Mailbox posts are an interesting item. They can be used to add a decorative flair to your home, or they can be used for functional purposes. Whatever the reason behind you purchasing one of these items, hopefully, this review will help you find the perfect mailbox post that’s right for you.
Benefits of mailbox posts:
- Your letters might not get wet due to erosion around the base of the mailbox which could lead them to be lost if they’re submerged too long;
- The post can withstand sleet and snow better than most fences because they don’t usually cover much space on top for these things to accumulate. They also provide an obstacle against animals who may use your fence as their bridge;
- It’s more visible at night since most people drive by mailboxes on the way to their house in order to distinguish which one is theirs;
Mailbox posts can be a lot more expensive than you might expect, but they have high-quality materials that are worth investing in overtime. It’s always better for your mailbox to stand stationary when it has been installed correctly with a durable post and no longer needs constant maintenance from being hit by cars or other drivers who don’t pay attention.
There are plenty of benefits that make these posts worthwhile investments even though they’re not cheap upfront.
The following guide discusses features of the best mailbox posts and some of their benefits as well as the top five product reviews in detail so that if you have any questions about them, our team has got it covered.
Table of Contents
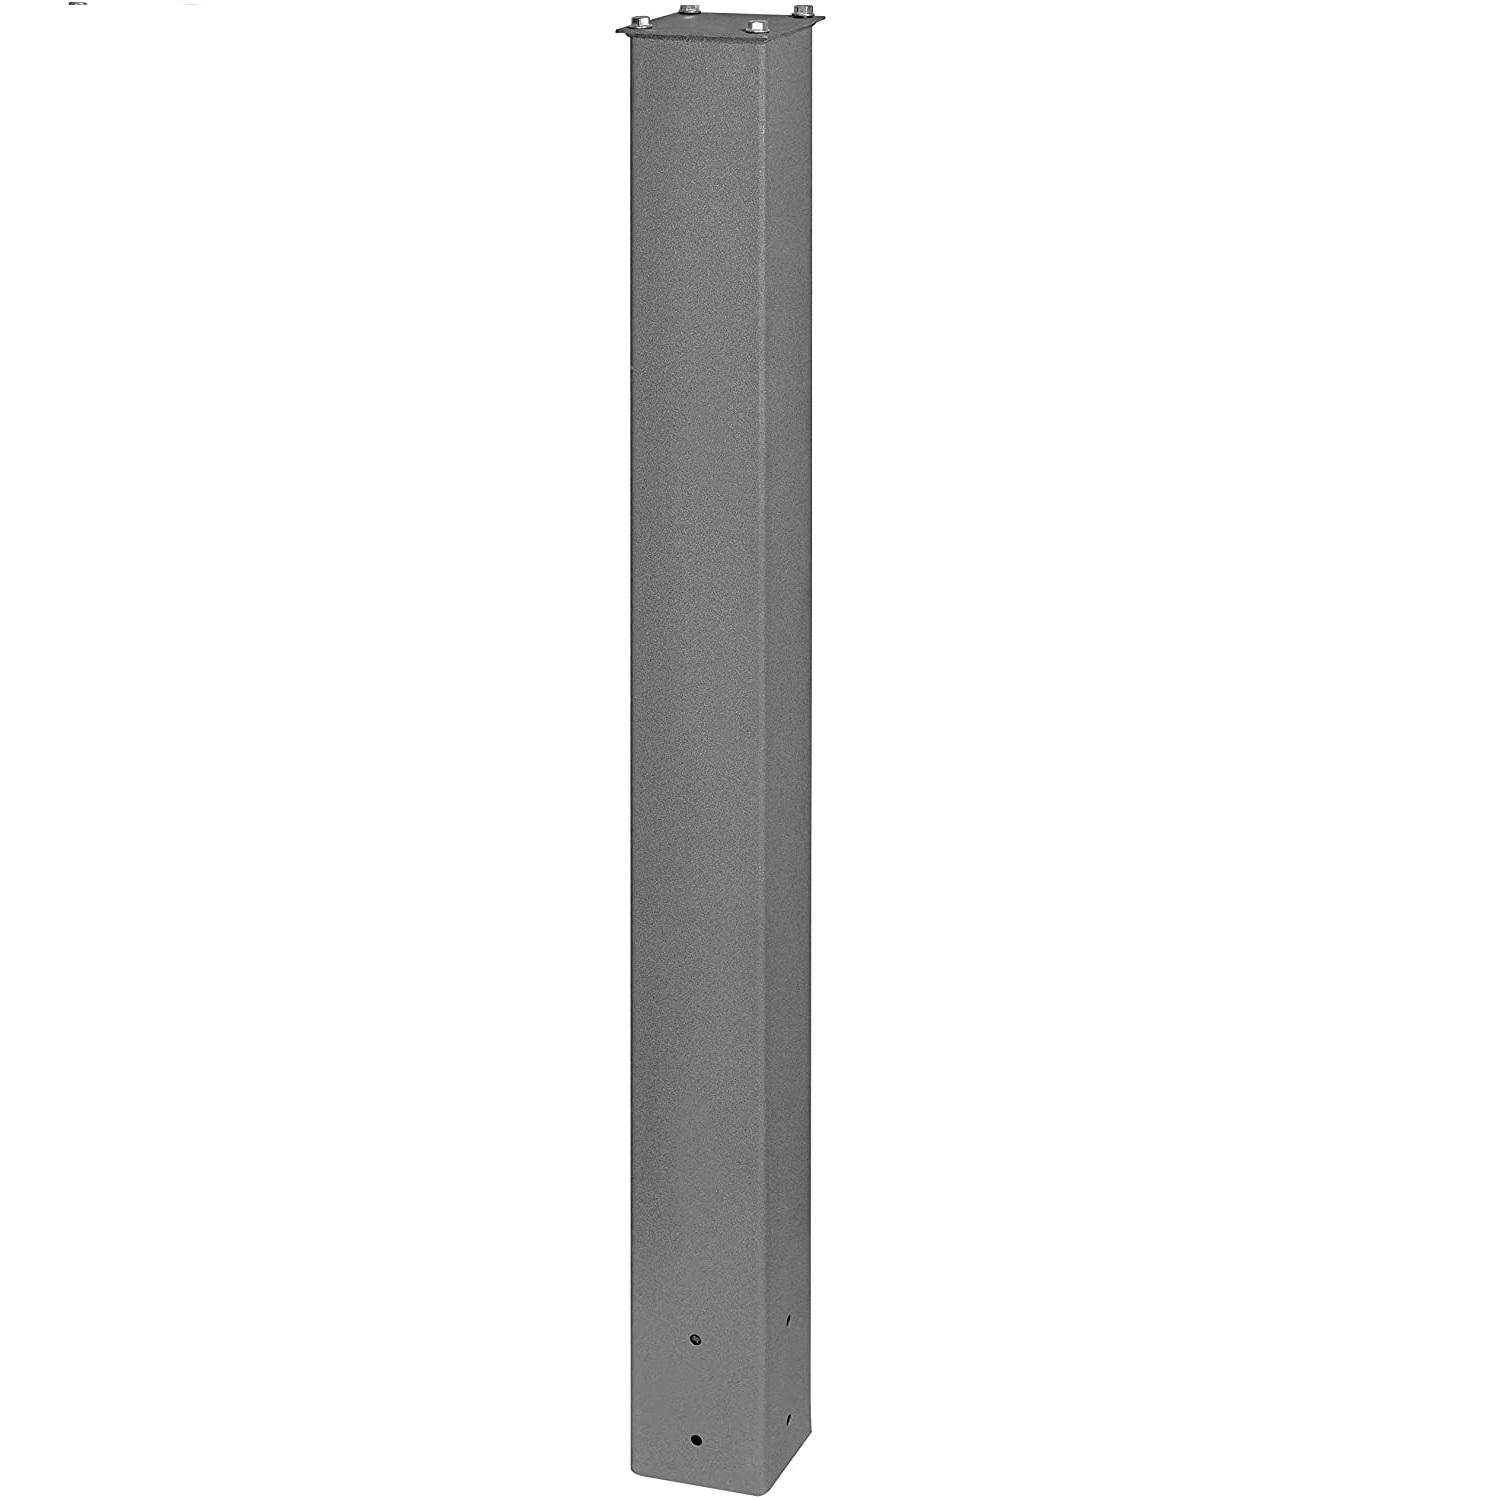
Mail Boss 7120, Granite In-Ground Mounting Post – the Editor’s choice!
The Mail Boss 7120 in-ground mounting post is made to accommodate larger yards and can be mounted on any type of soil without slippage. The 10- and 14-gauge heavy-duty electrogalvanized Steel makes this 43-inch post perfect for deep in-ground installations. It comes with 4 mounting bolts and clear Instructions on how to install it too.
The powder-coated finish will add an elegant look to your yard. And with a 1-year warranty from Mail Boss this is one purchase that will turn out sweeter than expected.
It’s always a pain when the postal service leaves your package in the dirt. Luckily, with Mail Boss’ Granite In-Ground Mounting Post, you’ll never have to worry again. This durable post is perfect for securely installing your mailbox so that it stays clean forever.
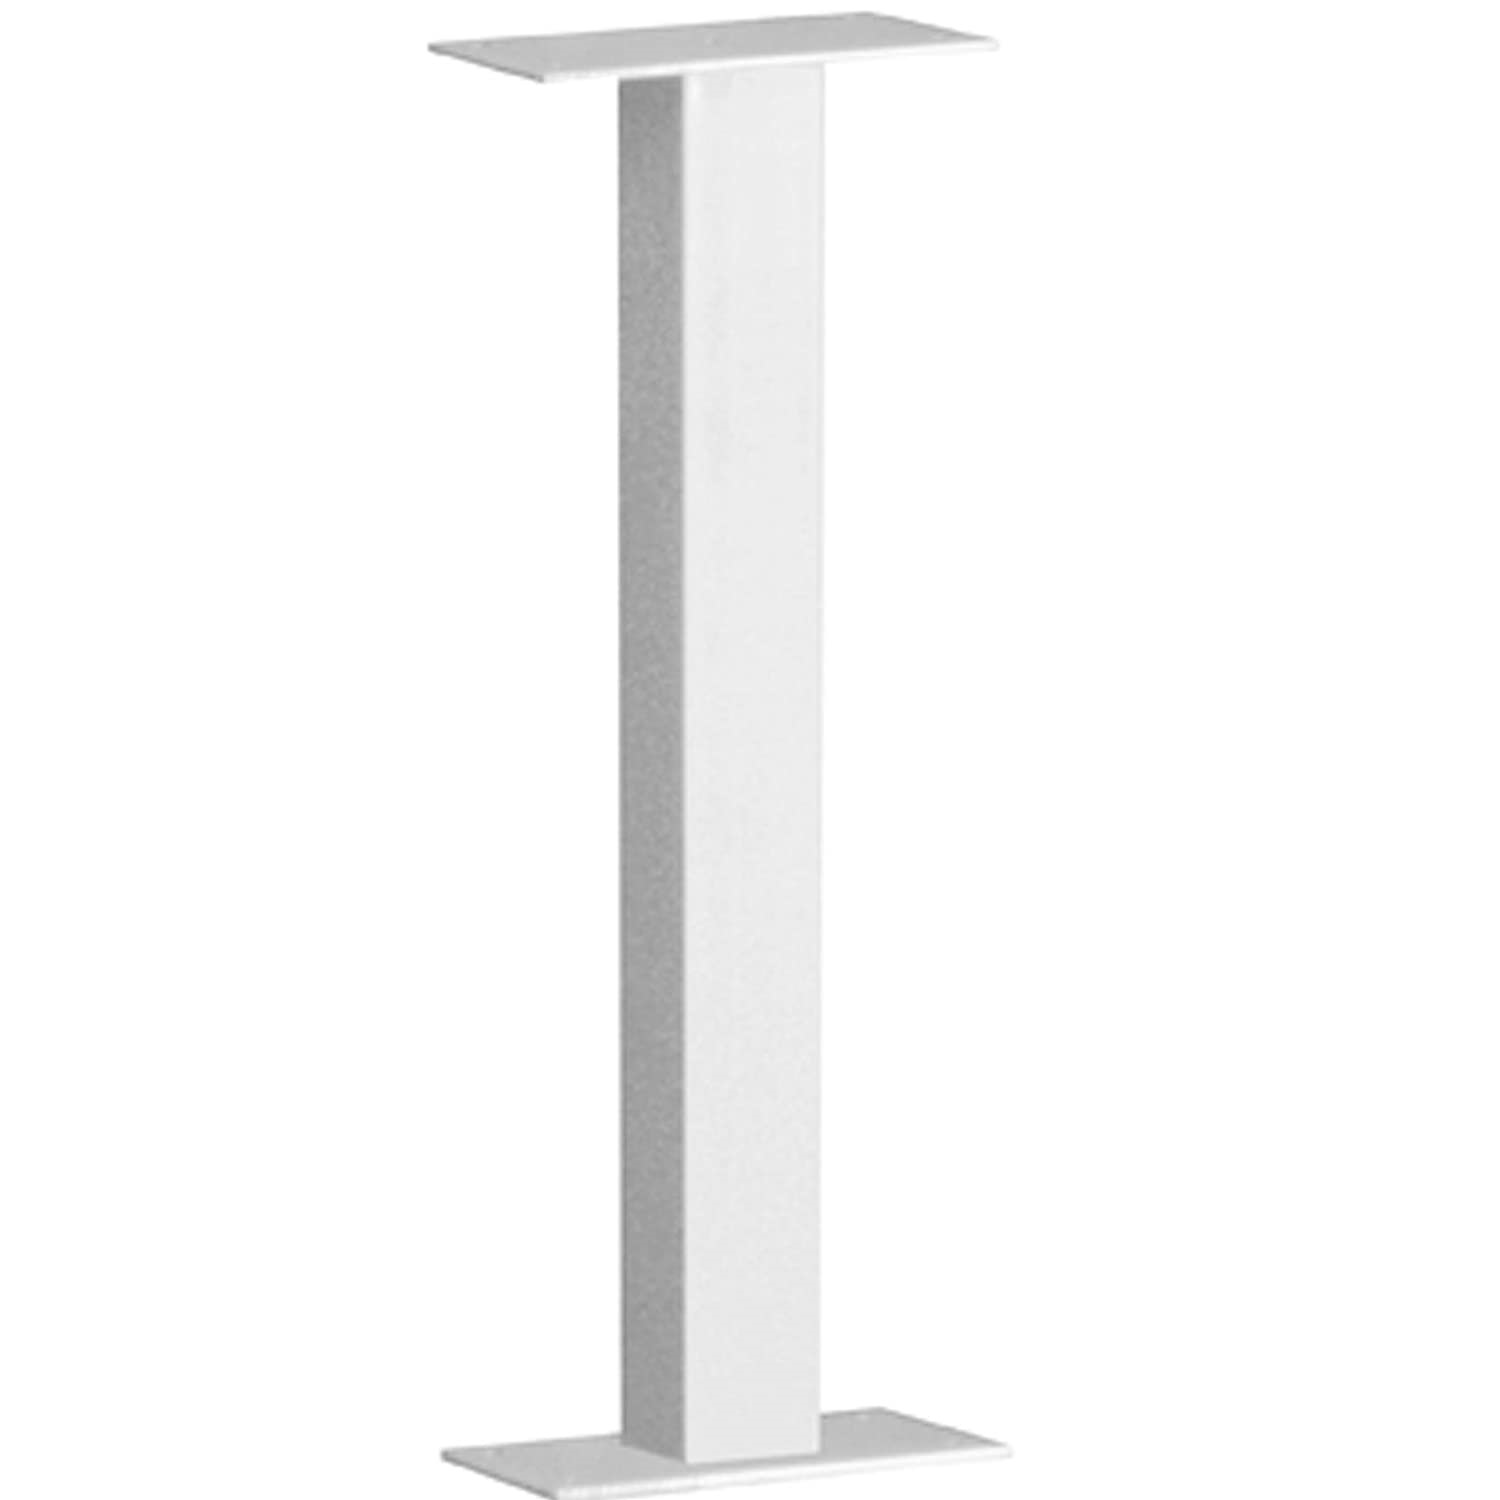
Mail Boss 7127 Surface Mount Mailbox Post – the best for sidewalks!
This fantastic product provides a safe and secure way to house your mail. Constructed of heavy-duty 10- and 14-gauge metal, the finish is sturdy and resistant to rust and corrosion.
This sturdy, steel mailbox post is built to last and can withstand even the toughest yard. The bolts are generously long so no worries about drilling too far in or having to get creative when it’s time for repairs. The ultimate mail solution for property managers, landlords, and residential homeowners.
With the Mail Boss 7127, you can mount a mailbox literally anywhere. This versatile and durable post includes in-depth instructions and four mounting bolts for any type of decorating situation.
Salsbury Industries Mail Chest Pedestal – the best for cold areas!
Do you have a mailbox that needs to thrive in tough conditions? This rugged, heavy-duty Salsbury Industries Mail Chest Pedestal can stick it through the frostiest and harshest of winters with ease. With four feet of height, this pedestal is perfect for those living below sea level (or just battling some extra deep snow).
Plus, it comes with a sturdy 4×4 tubular aluminum base with extra-large footings for stability against frost heaves. A sturdy package drop that can hold up to six sacks of mail, plus it’ll catch packages over 2 feet high that are dropped through the slot. It even looks nice enough for front yard installation because you can choose between a sloped or post mount style.
With most of the post buried and a weatherproof design, this will withstand even some of the harshest climates: up to -40 degrees Fahrenheit.
Architectural Mailboxes 5526W Surface Mount Mailbox Post – the best for easy installation!
These Architectural Mailboxes surface-mount mailboxes are durable, attractive additions to any home. With an included mounting plate and heavy-gauge steel tubing that’s built to last, our mailbox posts look great on their own or next to a metal fence post in your yard!
Welded to the top of the post is a zinc-plated mounting plate with 4 bolts for easy installation right out of the box. The Architectural Mailboxes 5526W post is easy to mount and includes zinc-plated steel hex-head bolts that will last for years with custom text or logo adding a unique touch.
This innovative mailbox is mounted on a concrete pad. It is designed to withstand harsh weather. Safeguard your mail with ease now, and for years to come.
Architectural Mailboxes 7509RZ-10 Redondo Mailbox Post – the best for corrosion resistance!
The Architectural Mailboxes 7509RZ-10 Redondo Mailbox Post shares its stylish color with a classic brown palette. The galvanized steel is backed by powdered coated bronze to help protect the post from corrosion. The 4-inch mounting-hole pattern means its installation will be quick and easy for customizing your mailbox set up.
It stands at about 6 feet tall and the whole package weighs in at a mere 10 pounds.
The sturdy red metal and rust-resistant coating mean it can withstand the elements year after year, keeping your mailbox looking its finest.
The Buyer’s Guide
Mailbox post materials
The materials used in mailbox posts are typically plastic or metal. Plastic is the cheapest option and will be less visible than metal when painted with a matching color to your house. Metal looks nicer but can rust over time if not treated properly.
Plastic isn’t as durable as metals like aluminum, copper or steel because it doesn’t hold up well against harsh weather conditions such as extreme heat from summer sun exposure and cold winter winds that blow snow on top of them. The durability factor also depends on how much maintenance you’re willing to do for each type of material post (e.g., painting wooden posts regularly). On average, plastic lasts about five or six years before rusting or breaking, while metal posts can last up to twenty-five.
Metal will be more expensive than plastic but you’ll have the peace of mind that your mailbox post won’t break down from changing weather conditions after a few short years. The most common type of metal for this project is aluminum because it’s lightweight and resistant to corrosion. Copper is also an option if you want something with a little less visibility (a darker color). Steel would make sense as well, though it might not blend in so nicely with your house paint colors since there are often different shades of gray between them.
PVC is less expensive than wood but doesn’t always hold up as well over time (particularly against extreme weather conditions). Wrought Iron will usually last the longest under any circumstances imaginable but can also end up being very pricey if not done right by an experienced craftsman who knows what they’re doing. Wood will eventually rot away after many years but it’s generally seen as one of the most attractive options available when considering its appearance both during installation and pre-faded years down the road.
How to choose a mailbox post?
There are some factors to consider when choosing a mailbox post. Some of the most important ones include:
- Style. Mailbox posts come in many different styles including traditional American colonial designs, Victorian-looking elements like wrought iron scrollwork, rustic beams and shingles on logged cabin-themed houses (or faux logs), modern geometric lines that appear almost abstract. If you’re not sure what type of design would suit your home best, it never hurts to consult a professional about your options;
- Space. Mailbox posts typically range in height from 12 inches (for more petite homes) to 84 inches or 5 feet for taller houses and neighborhoods with large lots. You’ll also want to take into account how wide an area needs to be clear on either side of the post, as well as at its base so that people can walk by comfortably without tripping over anything. To learn which dimensions will work best for your home, measure distances between neighboring mailboxes and compare them against your lot measurements;
- Budget. The cost will vary with material and design, but, generally speaking, metal posts tend to be less expensive than vinyl or cast stone. Wood is typically cheaper than any other option as well;
Mailbox post installation
Mailbox posts are a necessity for people who want to install a new mailbox post. It is important that you take into consideration your current set-up and the size of your house before making this purchase, otherwise, it may not fit correctly in front of your property or driveways.
Luckily, mailbox posts allow you to choose the height and width. You can also include a flagpole or a flower pot on top so it will present your house as well-maintained. Many people have problems figuring out how to install them in their yard because they don’t know what type of tools to use for this task, but all you need is two screws and some water-resistant cement.
Follow these instructions carefully if you want your new mailbox post installed correctly:
- Find the ground where you would like to place the post by using a shovel or digging tool. Make sure it’s sturdy enough with no rocks underneath so that when your mail arrives at home it won’t get stuck trying to pass through;
- After you have cleared the ground, dig a hole at least 6 inches deep. If there are any rocks or roots in your way, use an ax to get rid of them;
- Once it’s done digging and all obstacles have been removed, place some water-resistant cement down on top so that when the post is put into place it won’t move around too much while holding up mail for delivery;
- The final step before installing this mailbox post would be to pour water over top until everything has completely soaked through (which should take about 5 minutes);
- You can also add another layer of cement if needed but make sure not to pour more than a couple of tablespoons worth because it will start to smother out what was already added earlier;
- Finally, test out by pushing down hard onto both sides of your new mailbox post just as though someone was delivering packages and see how sturdy it feels;
This is by far one of the easiest ways to install this mailbox post and it will save you a lot of time in the end.
When installing a mailbox post, it’s important to keep in mind all the landscaping features you have and include them in your measurements. For example, if you plan on planting flowers around the base of your new mailbox post installed the previous spring – make sure they will fit in that space comfortably after installation.
If you’re installing a metal mailbox post, make sure it has mounting brackets below its base so that it won’t sink into soft ground over time if installed improperly without them.
Comparison of Mailbox Posts: A Numerical Analysis
When it comes to choosing a mailbox post, there are a variety of factors to consider such as durability, height, material, and style. To help with the decision-making process, we have compiled a table with numerical data comparing different mailbox posts based on various indicators.
| Mailbox Post | Height (inches) | Material | Price Range | Weight Capacity (lbs) | Installation Type |
|---|---|---|---|---|---|
| Wooden post | 48 | Wood | $30-$100 | Varies | Surface mount |
| Metal post | 72 | Metal (usually aluminum or steel) | $50-$200 | 100-150 | In-ground or surface mount |
| Plastic post | 48 | Plastic (usually PVC or polyethylene) | $20-$70 | Varies | In-ground or surface mount |
| Masonry post | 48-72 | Brick, stone, or concrete | $100-$500 | Varies | In-ground |
The table compares four common types of mailbox posts: wooden, metal, plastic, and masonry. The height of the posts ranges from 48 to 72 inches, with the masonry post having the most variability in height. The material of the posts varies greatly, with wooden, metal, and plastic options available. Prices range from $20 to $500, with masonry being the most expensive option. Weight capacity varies between posts and is dependent on the specific model chosen. Finally, installation types also vary with in-ground or surface mount options available.
This table can help individuals make an informed decision when selecting a mailbox post that best suits their needs and preferences.
FAQ
Can a mailbox post be cemented into the ground?
The answer to this question is yes, but it does depend on the type of ground you’re trying to cement your post into. If you have clay soil or loose dirt then there’s no need for concrete as long as you use plenty of stakes and string ties to secure the post in place with wire.
However, if the ground consists mostly of rock, ice-thawing permafrost, mud – anything hard like these conditions – then a more secure method may be needed such as using bolts instead of strings and tie wires. Otherwise, your mailbox post could get pulled right out by high winds or an earthquake.
How deep should a mailbox post be buried?
A mailbox post should be buried at least 12 inches deep. This is what the USPS guidelines recommend, and this depth will create a sturdy mailbox that lasts for decades to come. If you don’t want it too far into the ground, consider using an anchor kit with bolts or concrete so your mailbox stays in place even if there’s a strong storm.
Do mailbox posts come with a mailbox?
No, mailbox posts do not come with a mailbox. A buyer must purchase the mailboxes separately from their mailbox post.
Can you make your mailbox and post?
Yes, you can. In general, the basic mailbox post is made out of PVC pipe and a steel or aluminum cap. The two pieces have to be sized to match your specifications for height and width. You will also need a drill to insert screws that attach the posts with large washers on either side. Once assembled, your new mailbox should be sturdy enough to withstand bad weather conditions like snow as well as other forces from outside sources like animals.
The PVC pipe you need for your mailbox post is available at hardware stores and lumber yards. The only other thing you might want to invest in are the metal screws, washers, bolts or wing nuts that will be necessary depending on what type of steel cap you get from a hardware store. You can find these items online as well if they’re not readily accessible near where you live.
How to make a sturdy mailbox post?
To make a sturdy mailbox post, you want to use treated lumber and embed it in concrete. This will give the best support for your mailbox stand as well as making it last much longer than without cementing it into the ground. Treat lumber is more expensive but can be found at any hardware store or home improvement center. You’ll also need some wood screws, lag bolts, drill bits, shovels and mixing equipment (mixer/shovel).
To do this project yourself:
- Drill holes every six inches around the perimeter of all sides of four pieces of timber that are about two feet long each;
- Drill holes approximately one inch deep with similar spacing on opposite faces to ensure stability when assembling them later on;
- Use a bracket to attach the posts at each corner, using two lag bolts for every assembly. Keep the bolt heads flush so they don’t interfere with assembling them later on;
- Make sure that you have a level surface and measure out your 96-inch square area;
- Mix concrete (both dry powder and water) into a thick slurry in accordance with the manufacturer’s instructions. You can buy premixed cement if you want but it is more expensive than doing it yourself;
- Set posts into concrete (screws and all) so they are touching one another but do not stick out an inch or more beyond the edges of your 96-inch square area.;
- Mix up a thick slurry to pour over the outside surface for waterproofing that will bond with cement around wood screws. It is important to make sure this layer is at least 2 inches high on each side to prevent water seepage;
- Allow 24 hours before removing brackets attaching 4 pieces and then remove them completely after 48 hours when you can see any remaining movement in wetness has been absorbed by wood;
- You can use a primer to further seal the posts if you want though this is not necessary for most installations;
- With patience, it should take about 4 hours or less total time to build your mailbox post that will last for years;
Do you need permission to move your mailbox?
Requiring permission to move a mailbox is an uncommon law in the United States. If you are considering moving your mailbox, it’s important to check with local authorities about this rule before making any changes. For example, if there was a discussion at your homeowners’ association and they voted against mailboxes being moved within the neighborhood then that would be one situation where you might not have permission to do so without approval from everyone involved first.
But for most people who want their mailbox moved because of new landscaping or other reasons (such as construction), it will depend on what kind of fence surrounds your property and whether anyone else has access to come onto it out-of-sight from passersby. In some cases, fences may allow for in-and-out access, so it’s important to contact your local authorities for specifics about any permits you might need.
How long does it take to install a mailbox?
Installing a mailbox can take up to three hours or more. If you are installing it yourself, be prepared with the correct tools and materials such as an electric screwdriver/drill driver set, drill bits, wire brush for scrubbing any rust off the post before installation (optional), cable ties, safety goggles (recommended), etc.
You will also need some heavy equipment if your posts are in-ground: shovels and pickaxes. The last step is making sure that everything looks right so double-check all work by looking at every side of your new mail box’s position. If you use concrete, it may take an extra 48 hours to get it done.
How much quikrete do you need for a mailbox post?
A typical mailbox post should be about 18 inches tall. To calculate how much quikrete you need, multiply the height of your desired post by three and then divide that number in half. So, if you want a 24-inch high mailbox post, triple 24 to get 72. Then take 72 and divide it by two for 36 cubic feet (ft) of concrete needed to pour into one bucket or trough at a time.
If you are using precast concrete pavers instead of bricks, adjust accordingly: double the height of your preferred posts before calculating the amount of quikcrete required. For example, 48-inch posts would require 144 ft/lb but only 96 cubic ft. total because they have an average depth between 12 and 18 inches.
If you are using a concrete form, then the amount of quikrete needed is about two cubic feet less than if you pour it freehand from buckets or troughs. The reason for this is that there will be more room in the mold to allow for settling as the work progresses, without including too much excess material when finished with its original level of fill.
Can the postmaster make you move your mailbox?
Yes. The postmaster may require you to move your mailbox if the door is no longer in compliance with postal regulations and standards, or if it poses a danger to other people that live nearby. This can include steps taken by USPS for security reasons as well. In these cases, the post office will send written notice and give 45 days before installing the new box closer to their building for safety purposes. You’ll have 30 days from when they install it before it becomes permanent – after which you cannot request its removal without incurring costs on yourself.
What materials are commonly used for mailbox posts?
Mailbox posts are often made of wood, metal, or plastic. Wooden posts are a popular option due to their traditional look, while metal and plastic posts offer durability and weather resistance.
What is the standard height of a mailbox post?
The standard height for a mailbox post is between 41 and 45 inches from the ground to the bottom of the mailbox. This ensures that your mailbox is easily accessible for mail carriers and safe for passing vehicles.
How do I install a mailbox post without cement?
One way to install a mailbox post without cement is by using a post anchor. These anchors are typically made of metal and provide a stable base for the post. Another option is to use a drive-in post spike, which is hammered into the ground and provides a secure foundation.
What is the difference between a single and double mailbox post?
A single mailbox post is designed to hold only one mailbox, while a double mailbox post is designed to hold two mailboxes. Double mailbox posts are often used for homes with multiple occupants or for properties that require a separate mailbox for outgoing mail.
What are some decorative options for mailbox posts?
There are a variety of decorative options available for mailbox posts, including ornate designs, post caps, and planters. Some homeowners also choose to paint their mailbox post to match their house or add a personal touch.
How do I maintain my mailbox post?
To maintain your mailbox post, it’s important to regularly check for any signs of damage or wear. If your post is made of wood, it should be treated with a water-resistant coating to protect it from the elements. Metal posts can be painted or coated with a rust inhibitor, while plastic posts generally require no maintenance.
Can I install a mailbox post myself?
Yes, installing a mailbox post is typically a straightforward process that can be done by most homeowners. However, it’s important to follow any local regulations regarding mailbox placement and installation to ensure that your mailbox is properly installed and accessible to mail carriers.
What are some safety considerations when installing a mailbox post?
When installing a mailbox post, it’s important to consider safety for both mail carriers and passing vehicles. Make sure your mailbox is located at the recommended distance from the edge of the road and that it doesn’t obstruct the view of drivers. Additionally, be sure to follow any regulations regarding mailbox height and visibility.
What is a good way to secure a mailbox post in place?
One of the most effective ways to secure a mailbox post is by using concrete. Dig a hole deep enough to accommodate the post and then fill the hole with concrete, making sure the post is level and straight. Once the concrete has cured, your mailbox post should be securely in place.
What should I do if my mailbox post becomes damaged?
If your mailbox post becomes damaged, it may need to be repaired or replaced. Depending on the extent of the damage, you may be able to repair it yourself using wood filler or metal patches. However, if the damage is extensive or the post is structurally unsound, it’s best to replace it entirely.
Can I attach a newspaper holder to my mailbox post?
Yes, many mailbox posts come with built-in newspaper holders or can be easily modified to accommodate one. Alternatively, you can purchase a standalone newspaper holder that attaches to the mailbox post or hangs on the mailbox itself.
What should I do if my mailbox post is leaning?
If your mailbox post is leaning, it may be due to a number of factors, including soil erosion, improper installation, or damage to the post itself. Depending on the cause of the lean, you may be able to fix it by reinforcing the post or using a brace to keep it upright. If the lean is severe, however, you may need to replace the post entirely.
How can I add lighting to my mailbox post?
There are a variety of options for adding lighting to your mailbox post, including solar-powered lights that can be mounted on the post itself or on nearby trees or shrubs. Alternatively, you can install low-voltage landscape lighting that is wired into your home’s electrical system.
Useful Video: 9 Best Mailbox Posts
Final thoughts
At the end of the day, you want to find a mailbox post that suits your needs. Whether it be for decoration or function, these posts can help make any space feel more like home. If this guide has helped you narrow down your search, we’re happy to have been able to assist in making one of life’s little decisions easier.